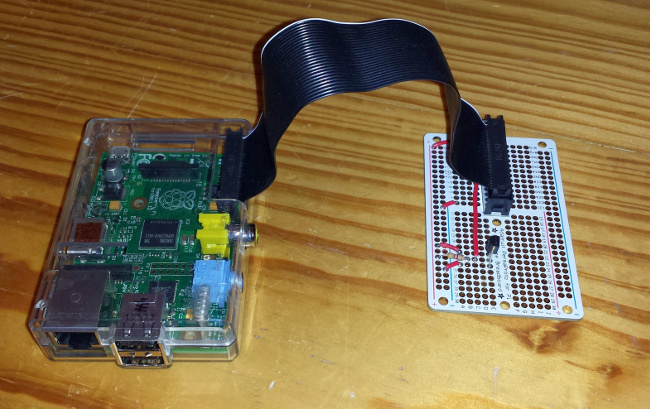
Have you ever looked at network enabled temperature monitoring hardware for server rooms? It’s unbelievable how much people will charge for such a simple device. It upsets me that vendors think they can charge so much money just because they can. Since I have such an adverse reaction to the price of these devices I decided to try to find a more creative solution to the problem of server room temperature monitoring.
I had a couple of goals for this project. Primarily I wanted to make sure that the device would be able to tie into our network monitoring system using SNMP. Another goal was to have the device be cheap and as straightforward as possible. Finally, I wanted to have the device be relatively inexpensive to operate in terms of electrical cost. I was able to achieve all of these goals by using a Raspberry Pi as the primary device with a relatively inexpensive custom circuit board attached to the GPIO headers of the Pi.

Below is a list of parts that I used for this project. I tried to include everything needed except for soldering equipment. I like to shop at adafruit.com, so thats where my links will take you.
- DS18B20 Digital temperature sensor
- Red Wire
- Half-size protoboard with GPIO header
- Raspberry Pi shell
- GPIO ribbon cable
- Raspberry Pi Model B
- 3ft USB cable for Raspberry Pi power
- 5V USB power adapter
- 4GB SD card pre-installed with Raspbian
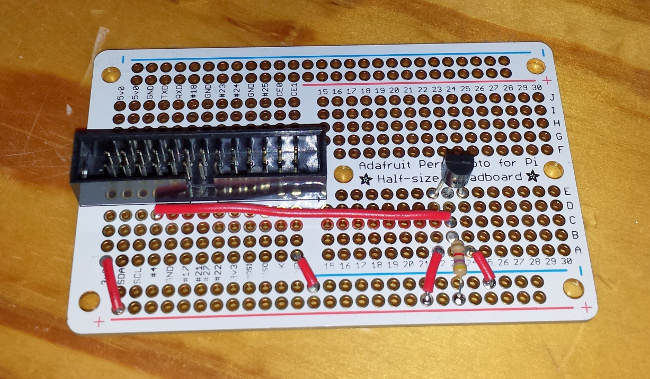
The wiring solution I used is based on the one recommend in the tutorial on the Adafruit site. I did lay out the components a bit differently as you can see below in this detailed view, though. I would recommend going through their full tutorial to get a feel for utilizing the temperature sensor.

You will need to make sure that your kernel loads the modules w1-gpio and w1-therm at start up. You can do this by inserting the following lines at the end of /etc/modules. You will then need to reboot or use modprobe to insert these two modules.
w1-gpio
w1-therm
The code I used was based on the code from the Adafruit tutorial, but modified to only output degrees Fahrenheit. I saved this Python script at /home/pi/temp.py
#!/usr/bin/env python
import os
import glob
import time

base_dir = '/sys/bus/w1/devices/'
device_folder = glob.glob(base_dir + '28*')[0]
device_file = device_folder + '/w1_slave'

def read_temp_raw():
    f = open(device_file, 'r')
    lines = f.readlines()
    f.close()
    return lines

def read_temp():
    lines = read_temp_raw()
    while lines[0].strip()[-3:] != 'YES':
        time.sleep(0.2)
        lines = read_temp_raw()
    equals_pos = lines[1].find('t=')
    if equals_pos != -1:
        temp_string = lines[1][equals_pos+2:]
        temp_c = float(temp_string) / 1000.0
        temp_f = temp_c * 9.0 / 5.0 + 32.0
        return temp_f

print(read_temp())
The last component was to set up snmpd to be able to execute the python script and return the results. Here are the contents of my config file at /etc/snmp/snmpd.conf. Make sure to restart the snmpd service after updating the config.
rocommunity public
extend temp /home/pi/temp.py
Finally, it’s time to test the output. From this system or another try doing a snmpget for the SNMP OID NET-SNMP-EXTEND-MIB::nsExtendOutputFull.”temp”.
> snmpget -v 2c -c public 127.0.0.1 .1.3.6.1.4.1.8072.1.3.2.3.1.2.4.116.101.109.112
NET-SNMP-EXTEND-MIB::nsExtendOutputFull."temp" = STRING: 73.2866
I am fairly pleased with the outcome of this little project. It’s good to know that you don’t have to pay hundreds of dollars for network enabled temperature monitoring equipment as long as you don’t mind a little tinkering. Hopefully this can solve the same problem for others out there as well. Happy soldering!
